Visualizzazione post con etichetta tutorial. Mostra tutti i post

mercoledì 17 agosto 2011

How to wrap confetti "pillow" style

Busy busy busy...
I'm going to move to a new house, and my scrapbook kits is all over the place...
Anyway, here's how to wrap confetti "pillow" style, and followed by some
idea for graduation/ laurea bomboniere
Material : red tulle fabric, ribbon, paper, stapler, bi adesivo
imagine there is a middle line dividing tulle into half,
put 5 confetti under that imaginary line.
 on top the confetti, place a 5x5cm card, you can
personalize the card with writings e.a;  name and
date of the event
fold up the downside tulle , covering the confetti
and card
Fold down the upside part of the tulle, now you can
see a tunnel on the left and right side of the confetti
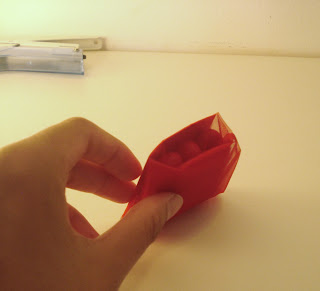
hold the left side with your left hand and...
...fastly fold it to the back, now your thumb is
holding the downside tulle , while the other 4 fingers
are holding the left side tulle and the confetti
fold back also the right side of the tulle
flip the back part facing up, right now you
cannot see the card anymore, and hide
the remaining tulle so it will look neat
secure with stapler
Fold inside the remaining "tail" covering the
stapler mark
Done!
If you'd like to see my graduation/ laurea creation;
 please check my next post " Idea for Graduation/Laurea
Bomboniere"

venerdì 25 febbraio 2011

Timbroscrapmania Stamping Challenge

I just bought my first stamps "Tim Holtz Shabby French" from Timbroscrapmania, and a very good motivation to use it right away ; behold : "The Stamping Challenge Yeah! and it will close in 24 hours ! double YEAH!!!

I've decided to make a "box of roses" pop up card 


The challenge is about using stamps, and I only have this "Shabby French",
so I clip the letter one by one (T-T)
 to create "Welcome Friends" sentiment


voila!


... and this 3D card is foldable too!


...just incase I want to send it by mail (^_^)

mercoledì 5 gennaio 2011

Butterfly spiral card

http://www.youtube.com/watch?v=i9o7COCcSMg

Hi, this is the post I promised on my last post "Last minute Christmas card". Finally I'm able to post it after finishing 3 other projects ;

1st. Right after Christmas - I need to prepare  napkin rings (14 of those) and 5 "segnaposto" (looks like favor box, just smaller) for last dinner on 2010 - I'll load some picts on my next post "New Year project part one"

2nd. Followed by the first of January lunch, I've prepared 11 favor boxes, please check also my "New Year project part two" post

3rd. Guido and Dora 60th anniversary on the 8th of January, I made 30 favor boxes (delivered today :D YEAH!!), it will be posted under the title of "Torte bomboniere, Nozze di Diamante"

Ok, now back to spiral card . I figured out how to fix the hole on the card, unlikely my previous card "Last minute Christmas card" post, so the spiral pop up will look really nice when opened vertically from the side :

Cut the spiral separately from other piece of paper, and then attach it to the card.

I recommend using a stapler, just to make sure it will hold the spiral firmly

conceal the stapler mark with another butterflies, or flower.  The bigger the spiral, the longer it will stretch, and the card will open wider.

 continue attaching more butterflies on the spiral, decorate with flowers. In this picture I'm using a lotus pop up flower.

decorate also the front card with the same color theme...and we are DONE! :D

(I was listening to Astrud Gilberto ; singing "It Might As Well Be Spring" over and over  again while making this card)
Related Posts Plugin for WordPress, Blogger...